How to Use Google Tag Manager: Setup, Tags and Consent
Learn how to use Google Tag Manager step by step: create a container, add tags and triggers, test in Preview mode and publish safely, with UK consent tips.
You've got a thank-you page that never appears in reports, and a ticket to "just add this pixel" that has sat with a developer since last week. The cookie banner is live, yet the analytics script still loads before anyone chooses Accept. That's the usual first week with a new container: tags exist, they don't wait, and nobody can say which event is allowed to fire.
How to use Google Tag Manager well means treating consent as the gate, not as a banner colour. Classify each tag, test it against the consent state it must obey, and publish only after that check passes.
Google Tag Manager Components at a Glance
Google Tag Manager is a container that sits on the site and holds the instructions for every tracking script. You change tracking from that interface instead of editing the theme every time a campaign changes. One container per website is the usual setup, and the only code the site needs is the install snippet.
A tag does nothing until something tells it to run. A trigger decides when it fires, and a variable supplies the values it sends. Triggers and variables do most of the work.
Component What it does Example Container Holds all tags, triggers and variables for one website One container per site, installed once Tag Sends a script or data to a service GA4 Configuration tag Trigger Decides when a tag fires All Pages, or Click - All Elements Variable Stores a value a tag or trigger can read Page URL, or Data Layer Variable Workspace Holds unpublished edits, separate from the live site Two editors working on separate changes Version A frozen, published snapshot of the container The version you roll back to after a bad publishYou need a Google account, editor access to the site's analytics property, and access to the template or CMS theme where the snippet goes.
What to track first
A good starting point is three jobs: a GA4 page-view tag, one conversion event, and one experiment script. Write down the three events you need and the page each one happens on. That list decides every trigger you build later.
Practical rule: If you can't name the page and the consent category for an event, don't build the tag yet.
How to Create a Container and Install the Snippet
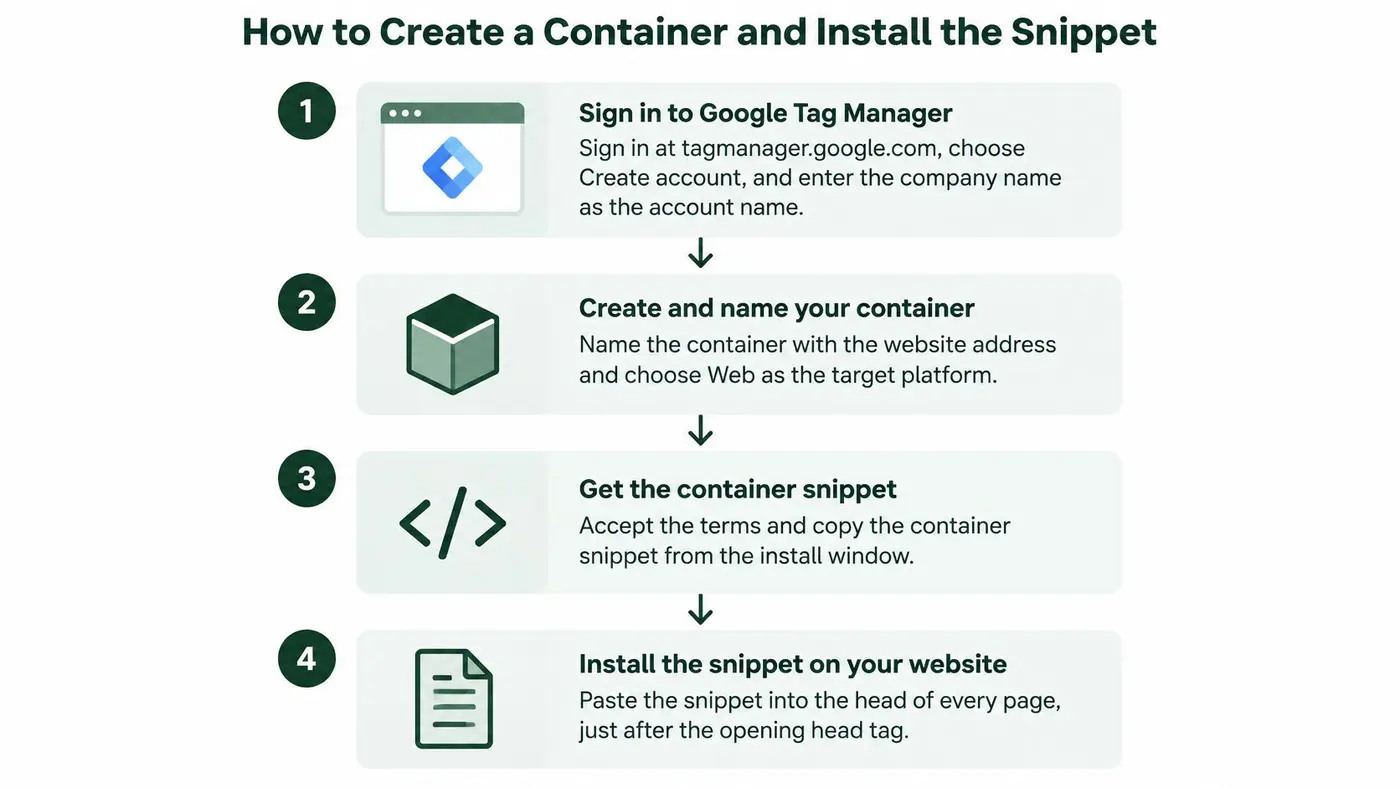
Create the container once, then stop touching the theme for ordinary tag changes. A second container on the same site is how duplicate page views start.
- Sign in at tagmanager.google.com, choose Create account, and enter the company name as the account name. If you're an agency, the client's own account is cleaner than a shared agency login.
- Name the container with the site's domain, such as
example.co.uk, and select Web as the target platform. - Accept the terms and copy the two snippets the install window shows.
- Paste the head snippet as high as possible in the
<head>, before other scripts. A head snippet placed under heavy scripts loads late, and early clicks never get recorded. Paste the body snippet directly after the opening<body>tag. A missing body snippet only affects visitors without JavaScript. - On Shopify, paste the head snippet into
layout/theme.liquidright after the opening head tag. On WordPress, Webflow, or a custom theme, use the theme header or the header-injection setting, not a random footer widget. - Publish the site, open Preview from the container, and load a live page. A working install shows the container connected, with no snippet errors in the browser console.
One snippet, then stop editing the theme
Keep a single container for the website. Two editors can still work at once, because each uses a separate workspace, and a bad publish is a version you can restore. Name tags by purpose from day one, such as GA4 - page view, so the next person can see what a change does.
A 2026 Firmbase technology-fingerprinting dataset identified 2,089 actively trading UK marketing agencies using Google Tag Manager. Among firms in that set with a detectable tag-management system, it appeared on 2,089 of 2,090 firms, or 100.0%. This is the route UK agency teams already use: one snippet, then tags managed in the interface.
Set Consent Rules Before Any Tag Fires
The failure I see teams ship first is a configuration tag that fires on All Pages before any consent state exists. The banner looks compliant. The network tab does not.
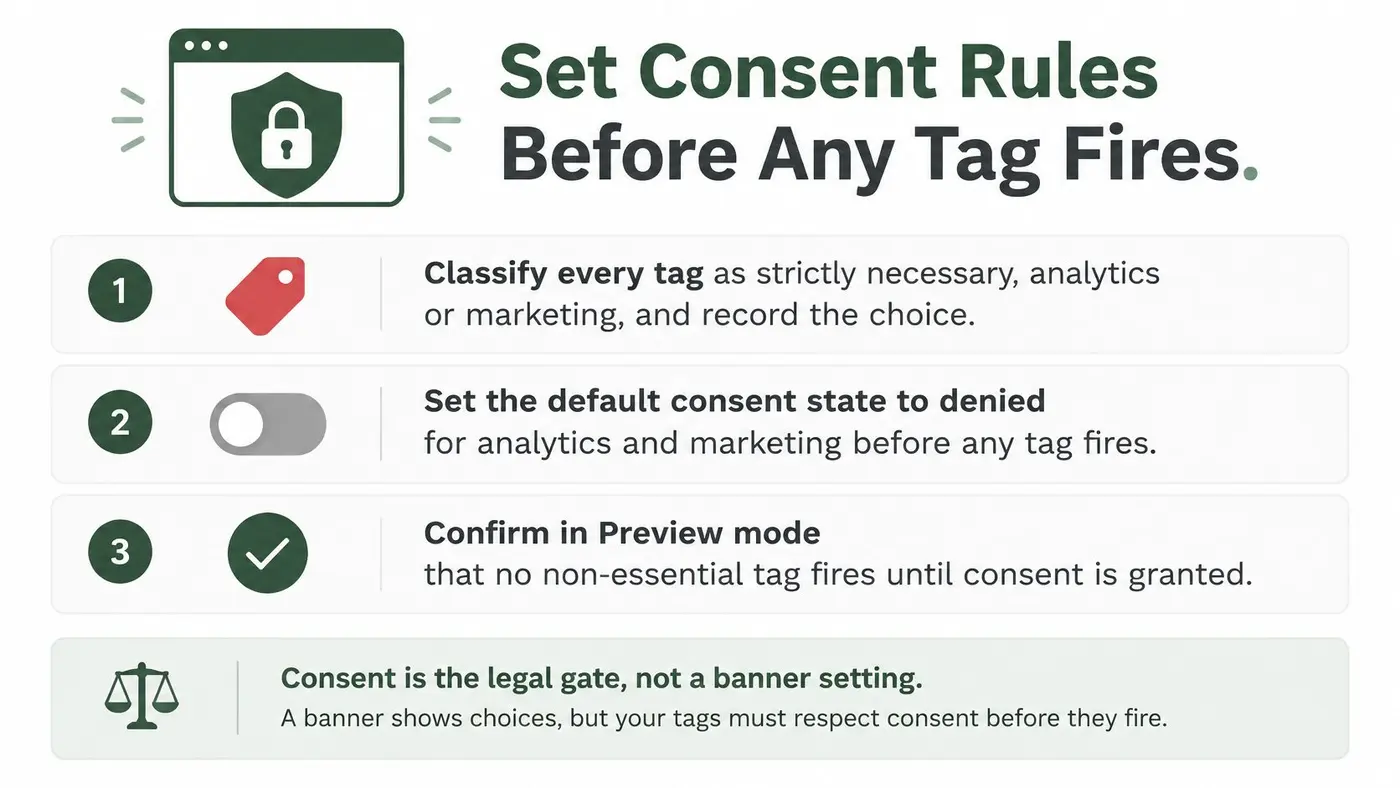
The UK ICO says organisations must explain what cookies and similar technologies do, obtain active and unambiguous consent for non-essential technologies, and make enabling or disabling them easy. That scope includes scripts and tags, not only cookies. A banner that loads Google Tag Manager anyway doesn't meet that bar.
GOV.UK's production approach is stricter than a banner on its own. It uses a blocklist during initialisation, adds consent configuration inside the container, and applies a blocking exception to all tags when the user has not accepted usage cookies. That also catches a custom HTML tag someone adds next month.
Build the gate in this order.
- Classify every tag as strictly necessary, analytics, or marketing, and write the category in the tag notes. Page views are not essential just because every guide uses All Pages.
- Save a durable preference in the banner, and keep the container and analytics scripts from loading until the visitor gives affirmative consent. Offer a way to withdraw that choice later.
- Set a consent initialisation trigger so the state exists before the first page-view tag evaluates.
- Add a blocking exception on analytics and marketing tags for the denied state.
- Restrict hostnames so tags fire only on approved production, staging, and development domains. GOV.UK uses a hostname exception for this.
- Test the matrix in Preview and in browser developer tools, then repeat it after any new tag.
Consent Mode is not consent
Google's Consent Mode documentation says that when storage is denied, tags can send cookieless pings, and it separates analytics storage, advertising storage, ad user data, and ad personalisation. A single "analytics consent" variable is too coarse for that split. Cookieless pings are a measurement fallback, not permission to run the process.
Consent Mode does not grant consent. If storage is denied, the tag still needs a lawful reason to run, and a ping is not that reason.
Common breaks are a configuration tag that fires before the consent state is available, page views treated as essential, and a custom HTML tag that ignores category rules. The same categories belong in your privacy and consent setup before an experiment script is allowed to load.
How to Add a Tag, Trigger and Variable
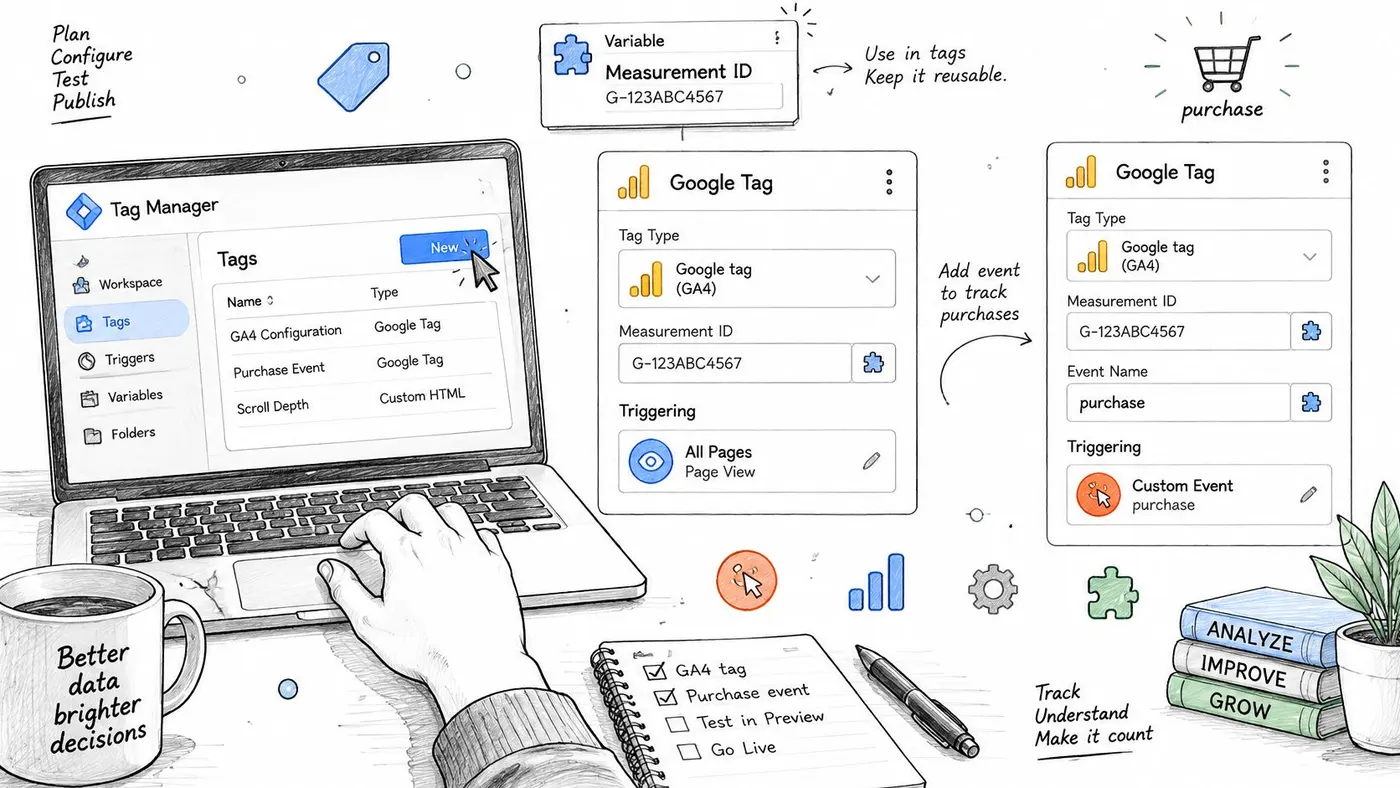
A visitor accepts analytics but declines advertising. Your analytics tag should be able to fire without opening the door to advertising tags. Build one tag at a time, attach the right trigger and consent condition, then check the values the tag will send.
- In Tags, select New and choose Google tag for your GA4 configuration.
- Enter the Measurement ID from your GA4 property. Use Initialization - All Pages only if your consent setup prevents the tag from running before the required consent state is available.
- Save, then create a second tag with the GA4 Event type. Enter
cta_clickas the event name. - Create a Custom Event trigger with the same event name and attach it to the event tag. Set the consent condition to match the category required for this event.
- Add a Data Layer Variable for each value the event needs, such as button text, page type or experiment name.
Treat the data layer as a contract
Use consistent event names, such as experiment_view, cta_click and purchase. Push structured values before the trigger evaluates. For a purchase event, include the transaction ID, currency, value, item data, experiment name and variant. Leave out names, email addresses and other personal information.
A data layer should contain only the values needed for measurement and reporting. Form fields do not belong there just because they are available. Keep the payload focused, then map each required value to a Data Layer Variable in GTM.
Trigger type Fires when Typical use All Pages Every page load Base analytics configuration tag Page View A page load matches a URL condition Thank-you or checkout page tracking Click - All Elements A clicked element matches the conditions CTA button and link tracking Form Submission A form is submitted Lead capture tracking Custom Event A dataLayer push uses a named event Experiment views, add-to-cart and purchase eventsClick and form triggers are quick to configure, but can stop matching when a button changes or a form plugin handles submission differently. For events you plan to report on, a named custom event gives the trigger a specific signal to listen for. Use one trigger per business event, and name each tag by purpose, such as GA4 - purchase.
If the event is pushed after the trigger has evaluated, the tag will not fire. Check the event sequence as well as the tag configuration.
Use Preview to check the sequence and compare the browser request with the intended payload. On a single-page app, check route changes for missing or duplicate page views. A purchase tag that fires again on refresh can double-count revenue. Consistent event names also make it easier to follow Google Analytics event tracking across your reports.
This walkthrough shows the steps for creating the first two tags.
Test Every Tag in Preview Before You Publish
A tag that looks right in the editor can still send the wrong property, fire twice, or fire with consent denied. Run this list before every publish, on staging first.
- Click Preview, enter the staging or live URL, and confirm the debug panel opens. If it won't connect, disable ad blockers or use a private window.
- For each page view and event, read Tags Fired and Tags Not Fired. The expected tag should sit under the trigger you attached, not under a broader All Pages trigger.
- Open the Variables tab and confirm each Data Layer Variable shows the value you pushed, including currency and experiment name.
- Read the Data Layer tab in event order. The consent state and the business event must arrive before the trigger that depends on them.
- Cross-check GA4 DebugView or the live report. Fired in Preview is not the same as received once, in the right property.
- Change route on a single-page app, then refresh the confirmation page. You're looking for a missing page view and a duplicated purchase.
Run consent beside the tag checks
Repeat the consent states in developer tools: first visit, refusal, acceptance, and withdrawal. On refusal, confirm there is no analytics request, no new analytics cookie, and no custom script from a marketing tag. On withdrawal, load the next page and confirm nothing new is written.
Check experiment allocation separately from purchase reporting. A variant can be assigned while the revenue event is blocked, or the reverse, and a single "it fired" note hides that split.
Finish with a pass or fail line for each event: browser, device, test URL, consent state, and whether DebugView showed it once. A later publish is only comparable if you kept that note. A fuller pass through Google Tag Manager testing is worth it before the container holds more than a handful of tags.
Publish Your First Version and Plan a Test
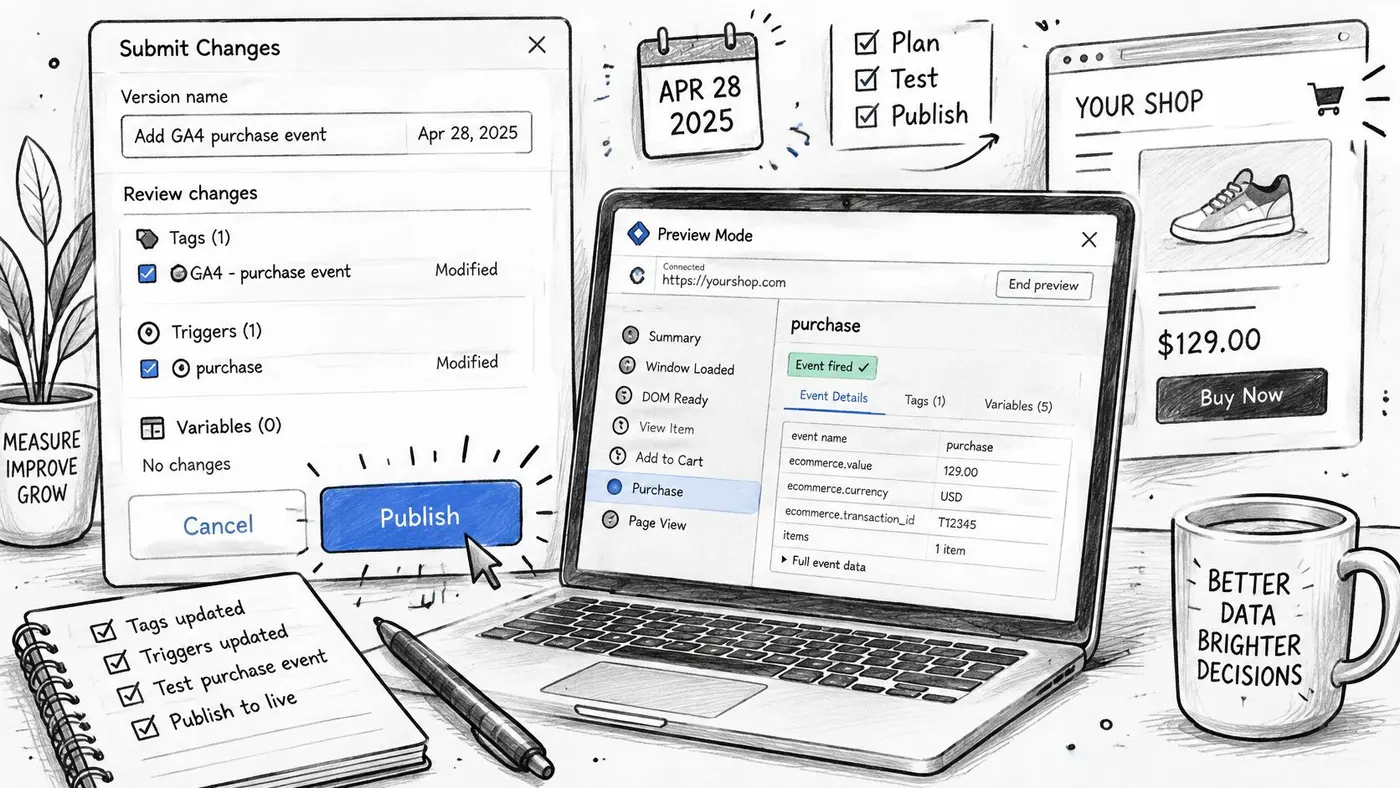
Unpublished work helps nobody, and a publish with no name helps nobody a month later. Use a short routine and keep the previous snapshot.
- In the workspace, select Submit. Name the version with the date and one line, such as
Add GA4 purchase event. - Read the changes list. If an unrelated trigger is in there, take it out. Workspaces mix easily when two people edit the same container.
- Select Publish, open the live site, and run the Preview checks once more on production. Staging and production hostnames are not the same fire.
- Leave the previous version in place. If a tag misbehaves, roll back from the Versions tab instead of editing live under pressure.
- Limit publish rights to two or three people, and write down who holds them.
I would publish the first version this week, with only the page-view tag and one conversion, then set a date to reread the event reports and the consent matrix. Adding the experiment script on the same day is how a bad trigger hides inside a bigger publish.
When the events are trustworthy
Once those events arrive once, under the right consent state, they're ready to act as test goals. Otter has setup guides for Custom JavaScript, Shopify, WordPress, Webflow, Wix, WooCommerce, ClickFunnels, Squarespace, Framer, Next.js and Google Tag Manager. Goal types are pageview, click, custom event, dataLayer event, revenue, and GA4, so a purchase or cta_click push you already built can be the goal without a second tracking snippet.
Otter A/B runs website experiments through the same Google Tag Manager container, and it can use the data layer events you just proved as goals, including revenue rather than clicks alone. You install one snippet, name the test, and read results on a live revenue dashboard, with setup guides for the platforms you already ship on. When your first version is published and the consent checks pass, start a test at Otter A/B.
Stop guessing
Ready to start testing?
Set up your first A/B test in under five minutes. No credit card required.
- 14-day free trial
- No credit card required
- Cancel anytime