Google Tag Manager How It Works: A Practical Guide
Google Tag Manager how it works: containers, tags, triggers and variables explained, with UK consent steps for tracking without editing site code.
If you've just taken over a Google Tag Manager container that someone else built, the first hour usually follows a pattern. You open the workspace, find a wall of tags named things like "GA4 - ALL PAGES FINAL v2", and then discover that the analytics revenue figure and the Shopify order total disagree by about a fifth. Nobody can say which one is wrong.
Then a colleague asks whether marketing can "just add a Meta pixel", and you're not sure if that's a five-minute job or a change that breaks three other reports.
Search for Google Tag Manager how it works and you'll get a hundred tutorials that show you where to click and almost none that show you the order of operations. That order is the whole thing. GTM is a small set of parts running in a fixed sequence, and once you can see the sequence, the interface stops feeling like a control panel and starts behaving predictably. The consent problems and the data quality problems come from the same place: a step in that chain that nobody checked.
The Four Parts That Make Google Tag Manager Work
A marketing tag needs a way to get onto the page, a condition that tells it when to run, and values to send. Google Tag Manager (GTM) organizes those jobs in one interface, so you can update tracking without shipping a code change for every destination.
The ICO's guidance on storage and access technologies describes tag managers as a way to add, edit or remove tags centrally rather than changing site code for each deployment. GTM is one of the most widely used tag management systems on UK websites.
The container comes first
A container is a snippet added to the site. It loads the published configuration in visitors' browsers, so changes made in GTM do not reach the live site until you publish them. The container holds the tags, triggers and variables that make up that configuration.
The four parts in plain words
Part What It Does Everyday Example Container Holds all tags, triggers and variables and loads from one snippet One container snippet on every page Tag Sends data or runs code when it fires GA4 configuration tag Trigger Sets the condition for a tag to fire Click on a Buy Now button Variable Supplies a dynamic value to tags and triggers Page URL or transaction value Data layer Passes structured information from the site to GTM Purchase event with order totalA restaurant helps make the roles concrete. The container is the kitchen. Tags are the dishes sent out, triggers are the order tickets that call for them, and variables are the details on each ticket, such as the table or meal choice.
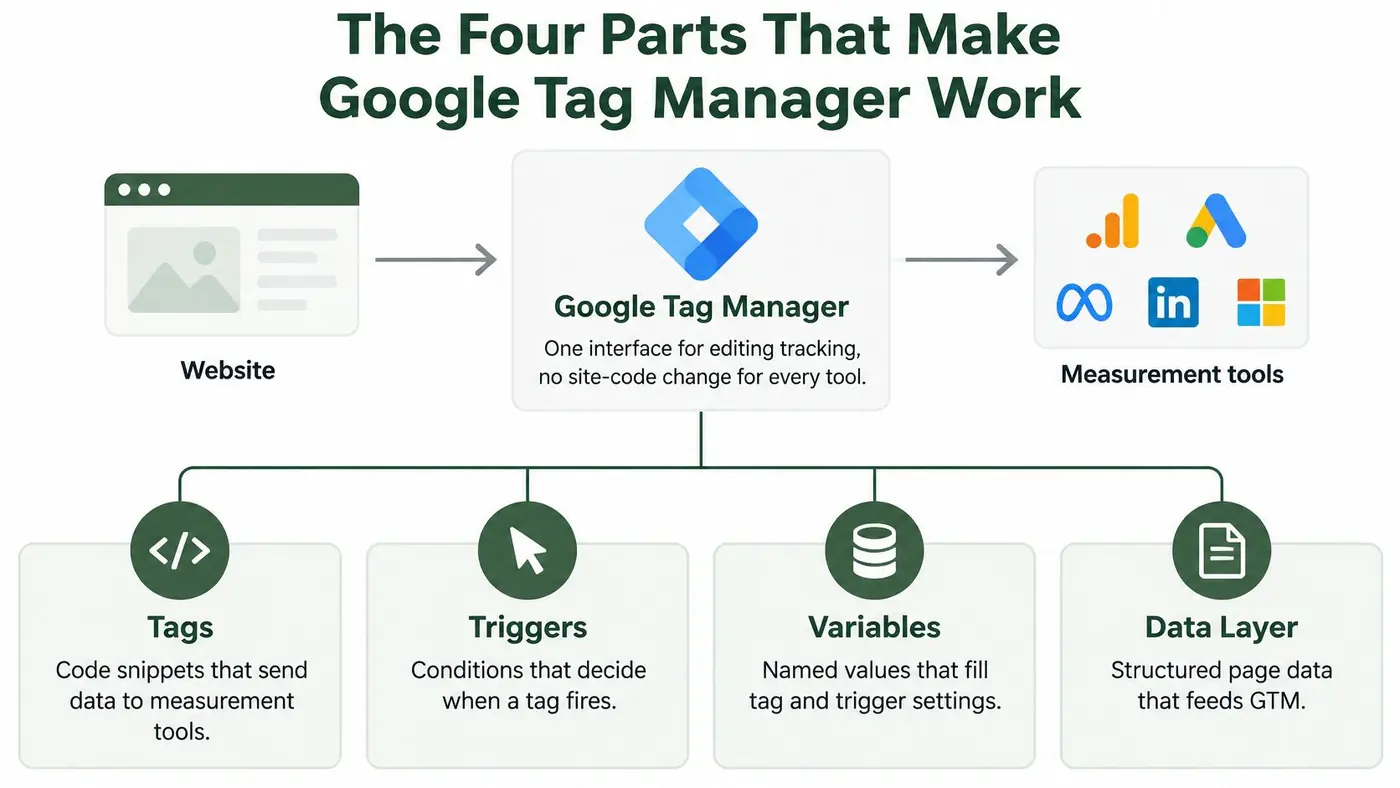
The kitchen rule: no ticket, no dish. A tag fires when its trigger matches, not simply because a page exists.
The data layer is like the order pad: it gives GTM structured information instead of leaving it to guess from page content. If the information is missing or inconsistent, a tag may send incomplete data even when its trigger fires. Consent rules also affect what tags can run, so a missing consent check can change what appears in reports.
Why the Data Layer Decides What Gets Tracked
Without a data layer, GTM reads values from the rendered page. It looks at the URL, the text inside a link, the class name on a button, the heading in the hero. That works until a designer renames a CSS class or a developer swaps a <button> for an <a>, and then your variable returns undefined and the tag sends an empty event. Nothing errors. The reports just get quieter.
A data layer fixes this by making the website tell GTM what happened, in a fixed vocabulary, instead of letting GTM guess from what it can see. It's a JavaScript array the site writes to, and GTM reads from it.
What a well-built push looks like
A purchase push carries a small, named set of fields. In a hypothetical shop, it looks like this:
-
eventholds the name that makes the push triggerable, herepurchase -
transaction_idholds the order reference, here8831 -
valueholds the order total, here39.50 -
currencyholdsGBP
The event field is special. GTM treats a push containing an event name as a moment in time, and that name becomes available to a Custom Event trigger. A push without an event name just leaves data sitting in the layer for later.
Where the data layer breaks
Three failures account for most of the damage in a broken setup, and each has an obvious symptom in reporting.
Duplicate pushes double count. A thank-you page that reloads, or a checkout script that fires on both the order confirmation and the browser back button, sends the same order twice. Your revenue total is inflated and your average order value drifts. The fix is a uniqueness check on transaction_id before the push.
Case mismatches stop triggers dead. A developer pushes Purchase while the trigger waits for purchase, and the tag never fires. No error message appears anywhere.
Missing fields leave variables blank. The tag fires, the event lands, and every row has an empty product name because nobody pushed it on that step.
Name your fields in one style, choose camelCase or snake_case once, and never mix the two in the same container.
Single-page apps and experiment flags
On a single-page application, the page never reloads, so a page view trigger fires once and then goes silent as the visitor moves through five screens. The site has to push its own event on each route change, and GTM listens for that name instead.
Experiment data belongs in the same push. When you run a test, expose experiment_id and variant_id as explicit fields rather than letting analytics infer the variant from what's on the page, because a DOM change during the test will fool that inference. If you want a deeper walkthrough of the field design, there's a solid guide to building a Google Tag Manager data layer that survives redesigns.
GOV.UK's own technical guidance on Google Tag Manager treats data-layer naming, event timing and trigger precedence as implementation dependencies, and recommends separate environments for integration and staging so untested tags never reach production.
Three things to confirm before you go further: each field has a fixed name, each push happens after the data exists, and one person owns changes to the layer.
Following One Event from Trigger to Tag
Say a shopper lands on a product page and clicks Add to basket. That single click passes through six stages, and every stage is visible if you know where to look.
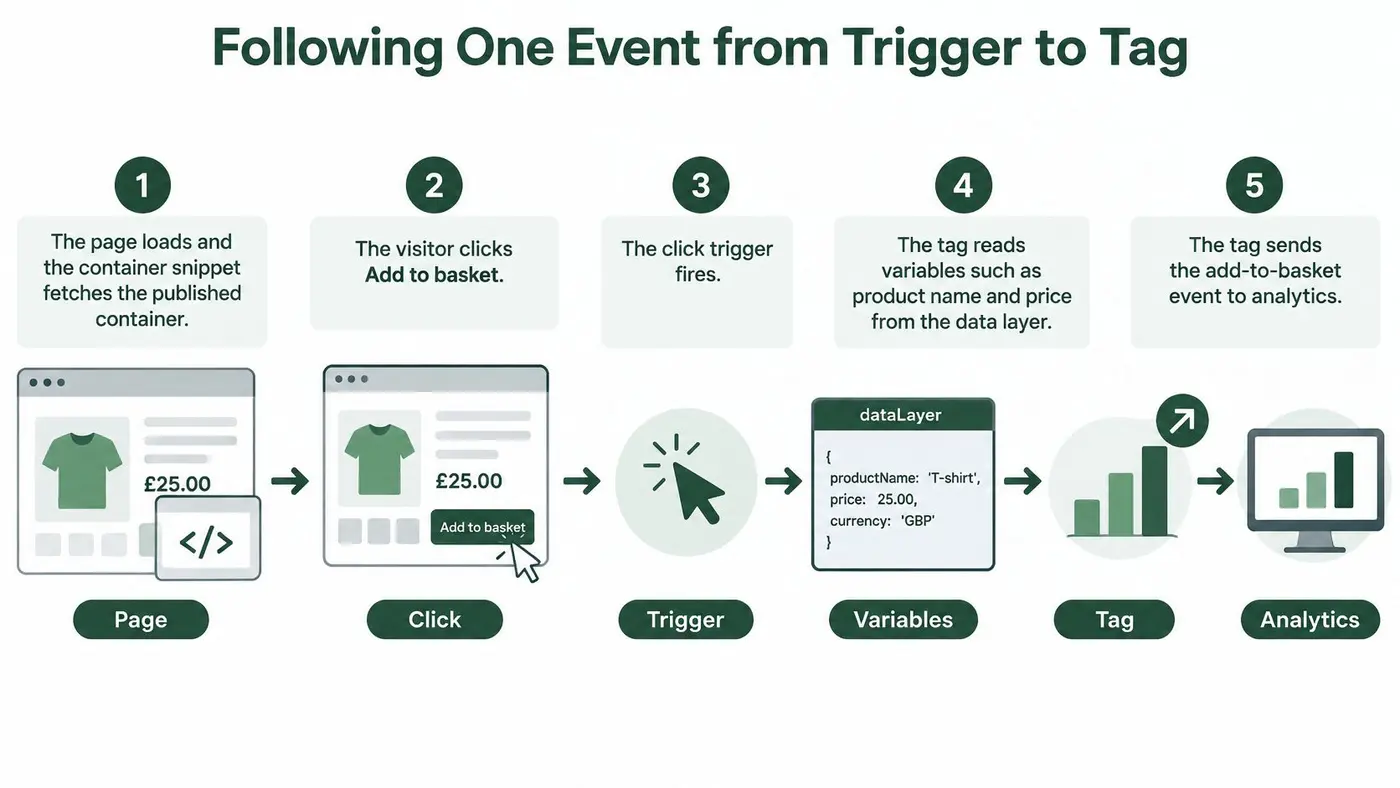
- The page loads and the container snippet runs. It fetches the published configuration, so the browser now holds every tag, trigger and variable you've published. If the snippet is missing from this template, nothing downstream exists.
-
The site pushes the event. The product page pushes
add_to_cartwithitem_idandvalueas the visitor clicks. The push happens in the click handler, after the basket logic confirms the item was added. -
GTM checks every trigger. The Custom Event trigger waiting for
add_to_cartmatches. Triggers forbegin_checkout,purchaseand page views don't. - The consent rule is evaluated. If the tag carries a blocking exception, GTM checks the consent variable before anything fires. No consent, no request leaves the browser.
-
The tag fires and resolves its variables. It reads
item_idandvaluefrom the data layer and sends the event to the analytics tool. - Preview mode records each stage. The timeline shows the event appearing, the trigger matching, the tag firing or being blocked, and the variables resolved.
Why the order matters
Trigger precedence is the part that catches people. When two triggers match the same event, their tags fire in an order you didn't explicitly choose, which is how a page view tag ends up sending before the analytics configuration tag has loaded. The event arrives at the tool with no measurement ID attached and disappears.
The other silent break is a renamed event. A developer tidies up add_to_cart into addToCart during a refactor, the trigger still waits for the old name, and add-to-basket tracking stops on a Tuesday afternoon with no alert.
Preview mode isn't a testing convenience. It's the only place the chain shows its work, stage by stage.
Read the timeline from the event on the left to the tags on the right. If the event appears and the tag doesn't fire, the fault is in the trigger or a consent block. If the tag fires and the variables are empty, the fault is in the data layer. If the tag fires with correct values and the report stays empty, the fault is downstream in the analytics tool. That three-way split will save you hours every time.
Consent Rules Every UK Tag Needs First
Here's the distinction that trips up otherwise careful teams. GTM reads consent. It doesn't collect it. A banner or a consent management platform records the visitor's choice and passes it into the container, and GTM uses that signal to decide which tags may fire. Tag-level consent settings are an execution control, not a legal consent mechanism.
The legal baseline sits elsewhere. UK government guidance states that non-essential analytics cookies require user consent under PECR and UK GDPR, and the ICO's guidance on consent and online tracking confirms valid consent is also required for personalised advertising that relies on storage and access technologies.
GOV.UK's analytics consent documentation shows how the control layer works in practice. Its implementation doesn't initialise analytics code or call the Google GTM/GA4 script until the user consents, and after consent an event listener initialises analytics and sends the page view. On top of that, every tag carries a blocking exception that evaluates a consent-derived lookup variable, so tags are prevented from firing when the consent value is not usage:true.
Classify every tag, including the ones you forgot
Tag Type Consent Category Firing Rule Example Analytics Analytics storage Blocked until consent is granted GA4 page view tag Advertising Ad storage Blocked until consent is granted Remarketing pixel Experiments Classify per assessment Sets no cookies until consent is granted Experiment assignment script Functional Strictly necessary Fires without consent Cookie banner script Custom HTML Classify each one before use Blocked until classified Third-party chat widgetCustom HTML is the row that gets skipped. A chat widget, a heatmap snippet or a hastily pasted verification code drops straight into a container with no consent category, and it runs for every visitor regardless of choice.
How to test a consent setup
Don't trust the banner appearing on screen. Open the browser network log and watch for requests. Before any consent action, filter for your analytics and advertising domains and confirm nothing left the page.
Then run the four states in order: reject everything, accept everything, accept only analytics, and withdraw consent after accepting. After each one, visit a second page and check that later page views respect the stored choice rather than the first decision.
Finally, test the race. The banner renders after the page begins loading, so the first page-view tag may attempt to fire before the consent state is readable. A default-denied state set before the container loads closes that gap.
A banner on screen proves nothing. The network log is the evidence.
Who signs off the consent configuration
Name an owner for the consent configuration and treat publishing changes to it like a code review: someone other than the author approves it, and the approval is recorded. Keep a dated record of what the configuration was at each change, because when someone asks in six months why an analytics cookie was set for a visitor who clicked reject, that record is the answer.
How Consent Choices Change Your Measurement
Once refusal rates climb past a handful of visitors a day, a comfortable assumption collapses: that your analytics numbers describe everyone. They don't. They describe the people who agreed plus whatever the platform can reconstruct.
Under advanced Consent Mode, Google's documentation on consent settings in Tag Manager explains that tags may load while consent is denied but send cookieless pings rather than storing cookies. When consent is granted, cookies and measurement data are sent.
Consent State Tags Load Cookies Written Conversions Reported Granted Yes Yes Observed, user-level Denied, advanced Consent Mode Yes, cookieless pings No Partly modelled, if data thresholds are met Denied, basic Consent Mode No No Not reported Not yet answered No, if default is denied No Not reportedModelling has a floor
Conversion and behavioural modelling fills some of the gap, but it only becomes available after implementation has run for at least seven full days and the account meets data thresholds. A small UK site, or a campaign narrow enough that its segments fall below those thresholds, may get little or nothing back.
That's the honest position. Consent Mode is a reasonable reconstruction of a partial picture, not a substitute for user-level attribution.
Three questions to ask of every tag
Separate these and the confusion clears:
- Did the tag fire? Check the container, not the report.
- Was a cookie written? Check the network log and the browser storage.
- Can this conversion be attributed reliably? Check whether the figure you're reading is observed or modelled.
For experiment work, add consent status as a dimension rather than an afterthought. Report consent rate by variant alongside conversions, and be suspicious when refusal is uneven. If variant B attracts more paid traffic, and paid traffic refuses consent at a higher rate, a winner declared on observed conversions may reflect who agreed, not which headline worked. For a deeper read on the paid side, Keywordme covers why consent choices skew PPC reporting.
The fastest setup isn't always the safest one to decide on. Fewer tags with clear observation beat more tags with missing data.
A Purchase Tracked from Start to Finish
One order, from banner click to report line, shows how the parts hold together.
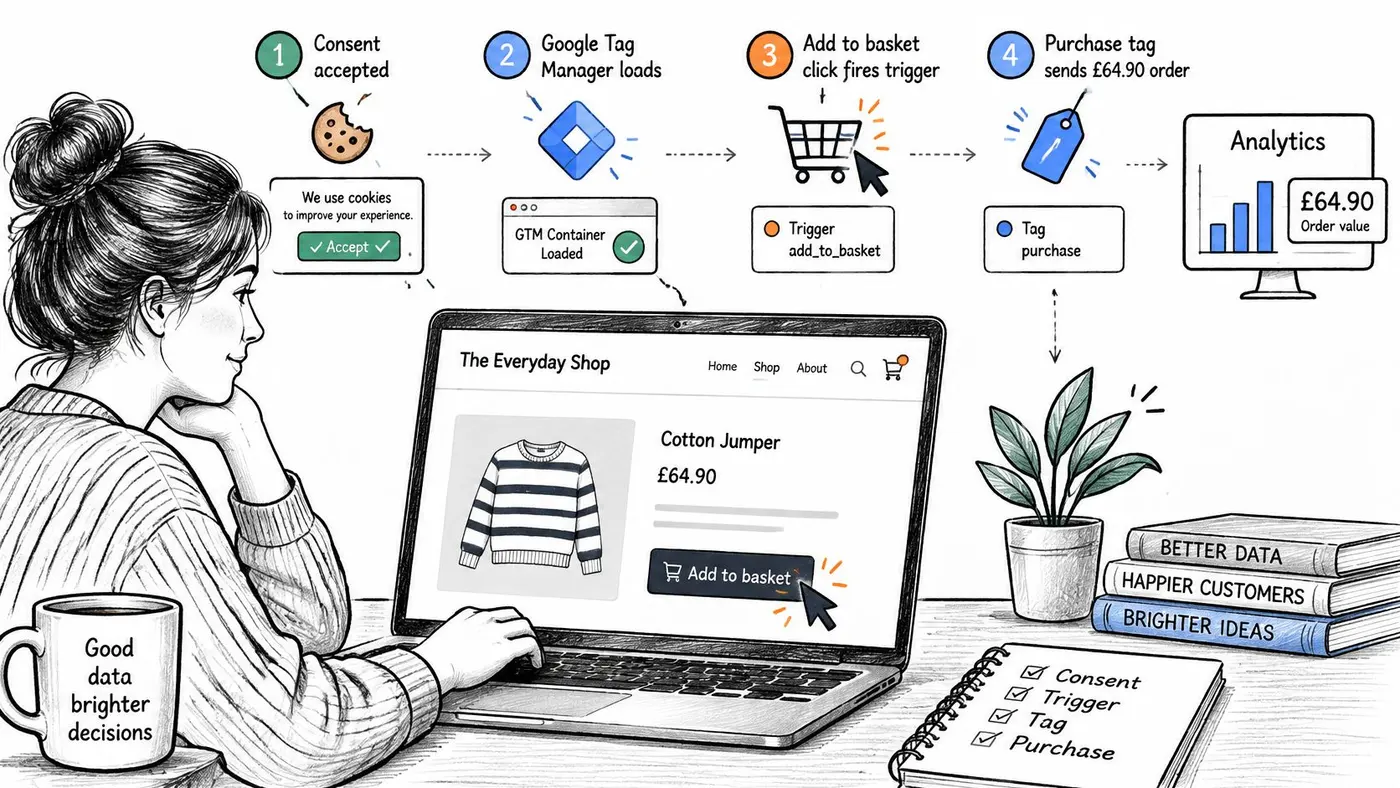
A visitor lands on a shop, accepts analytics consent on the banner, and the consent variable now reads granted. That single decision determines whether the rest of this sequence produces an attributable order or a cookieless ping.
-
The test assigns a variant. The visitor sees variant B of a headline test, and the site pushes
experiment_idandvariant_idinto the data layer alongside the page load. These two fields are the only thing that will later let the shop attribute revenue to a headline. - The basket fills. Add to basket and checkout started are pushed as named events, each carrying the item and its price.
-
The order completes. The confirmation page pushes
purchasewithtransaction_idset to10482,valueset to64.90, andcurrencyset toGBP. - The purchase trigger fires the GA4 event tag, which resolves the value and transaction ID variables from the push and sends the completed order.
-
The thank-you page reloads, and the same push fires again. The tag has to ignore the second one because
10482has already been recorded. A shop that skips this check reports every order twice.
What the report actually shows
Revenue by variant, but only if variant_id survived every step. The field was set at step one and has to still be readable when the purchase tag resolves its variables, which means it can't live only on the page where the test started. If the data layer resets on the next page load, as it does, the variant needs to be re-pushed or stored where GTM can read it again.
Where the chain snaps
Three break points, in order of how often they happen.
A missing variant field leaves every pound of revenue unassigned. The test keeps running, the dashboard keeps filling with revenue, and none of it maps to a headline. You end up with a result nobody can act on.
A duplicate push inflates revenue for one variant. The double count isn't symmetrical, so it can flip a close result.
A denied consent state removes the cookie, which removes the user-level attribution, which leaves you comparing a partially modelled figure against an observed one.
The conversion tracking layer that sits under all of this deserves its own attention, particularly on shops that also run paid campaigns. Boocoo's guide to connecting Google Ads to Shopify covers how the ad platform's conversion side meets the store's own events. If you want the analytics half of that chain in more detail, this explanation of how to track conversions end to end walks through the same purchase path.
Before trusting any of it, run three checks on your own purchase flow: place a real test order with a card you control, walk it through the preview timeline step by step, and compare the day's GA4 transaction count against the order system's count. A gap of one or two is normal. A gap of 20% is a broken chain, not a rounding error.
Publish Your First Container Without Breaking Tracking
- Create a workspace named for the change, such as "add GA4 add-to-cart", so the live container stays untouched while you work.
- Add the tag, its trigger and a consent classification, taken from the matrix, and write one sentence describing what it should measure. If you can't write that sentence, don't publish the tag.
- Run preview mode and confirm the tag fires only on its intended event and resolves the right variables.
- Repeat the consent checks for granted, denied and withdrawn states, watching the network log each time.
- Save a version with a name and a note describing the change, so a rollback is a single click rather than an investigation.
- Publish with permissions limited to named people, and record who approved it.
When the change supports a page test, such as a new headline or call to action, confirm that conversions and revenue still arrive through the same chain as before. A result produced by a broken chain can't be trusted, however clean the dashboard looks. A useful checklist for testing a Google Tag Manager container before it goes live covers the cases people skip.
Otter's Preview Tool validates click, pageview, custom-event, DataLayer-event and revenue goals in real time, which is the same discipline as walking a preview timeline before spending traffic. Pick one tag this week, publish it in a named workspace, and trace it from trigger to tag yourself.
Otter A/B reads the same Google Tag Manager events you've just mapped, so an experiment's winner is decided on purchases and revenue rather than clicks, and each order is linked back to the variant that produced it. Install the snippet, create a test, and watch what it earned on a live revenue dashboard instead of a conversion rate you have to interpret. Visit Otter A/B to run your first test free, with no credit card needed.
Stop guessing
Ready to start testing?
Set up your first A/B test in under five minutes. No credit card required.
- 14-day free trial
- No credit card required
- Cancel anytime